Showing posts with label Dessert Recipes. Show all posts

Saturday, February 2, 2013

Football Strawberries

super bowl snack

Super Bowl Snack: Football Chocolate Covered Strawberries

It's time for the Superbowl, here's a fun way of serving a snack for your get-together...Take a look at these adorable Football Chocolate Covered strawberries! It is super easy and the perfect addition to your party!
What you will need:
  • Strawberries
  • Chocolate (baking chocolate or chocolate chips work great)
  • White Icing
Directions:
  • Melt the Chocolate
  • Dip the Strawberries in the chocolate
  • Draw a football onto the strawberries!
  • Enjoy!

Sunday, January 27, 2013

Frozen Strawberries & Yogurt

Valentines Day Ideas

Valentines Day Ideas: Frozen Strawberries & Yogurt

I saw this adorable snack and thought it was perfect for this time of year with Valentine’s Day right around the corner. It is super easy to make and is a very healthy snack – especially with all of the yogurt deals we get great deals on! These are the perfect after school snack!
What you will need:
  • Strawberries
  • Yogurt (Greek/flavored anything you would like)
  • Freezer
Directions:
  • Optional: Cut the strawberries in half
  • Dip the Strawberries in yogurt
  • Put them in the freezer
  • Enjoy!

Friday, December 7, 2012

Cookie Dough Bites

cookie dough bites

I don't know anyone who doesn't like chocolate chip cookie dough. These are the perfect treat for dough lovers made without eggs and bite sized.
Hands-On Time: 20 minutes
Ready In: 1 hour
Yield: 2 dozen cookies
Ingredients
    1 cup salted butter, softened
    1½ cups packed light brown sugar
    1 teaspoon vanilla extract
    2 cups flour
    6 ounces miniature chocolate chips
Directions
  1. Cream butter and sugar together.
  2. Add remaining ingredients and mix well -- use your hands to get it together the best.
  3. Roll into 1-inch balls.
  4. Refrigerate until firm, about 30 minutes. Dip in chocolate, drizzle with chocolate or eat as is -- equally delicious no matter what!
  5. Let stand at room temperature for about 10 minutes before serving.
  6. Store in the refrigerator.

Thursday, December 6, 2012

Cookies and Cream Cheesecake Cupcakes

Until making these cookies and cream cheesecake cupcakes, with an Oreo on bottom, I hadn’t eaten an Oreo since I was a kid. This recipe not only brought back chocolatey childhood memories but also reminded me of how much I like Oreos. I didn’t think I liked them that much now that my palate has, ahem, matured, but I was wrong. Very wrong. And I also realized that it is very dangerous to not only make these cupcakes but to have a package of Oreos in the pantry. As I write this post the cupcakes have been long eaten and gone which is making me very sad. Looks like I’m off to the store to buy some Oreos…

Cookies and Cream Cheesecake Cupcakes

Yield: 30 cupcakes

Ingredients:

42 cream-filled sandwich cookies, such as Oreos, 30 left whole, and 12 coarsely chopped
2 pounds (4 8-oz packages) cream cheese, room temperature
1 cup sugar
1 tsp vanilla extract
4 large eggs, room temperature, lightly beaten
1 cup sour cream
Pinch of salt

Directions:

Preheat oven to 275°F. Line standard muffin tins with paper liners. Place 1 whole cookie in the bottom of each lined cup.
With an electric mixer on medium high speed, beat cream cheese until smooth, scraping down sides of bowl as needed. Gradually add sugar, and beat until combined. Beat in vanilla.
Drizzle in eggs, a bit at a time, beating to combine and scraping down the sides of the bowl as needed. Beat in sour cream and salt. Stir in chopped cookies by hand.
Divide batter evenly among cookie-lined cups, filling each almost to the top. Bake, rotating pan halfway through, until filling is set, about 22 minutes. Transfer to wire racks to cool completely. Refrigerate at least 4 hours (or up to overnight). Remove from tins just before serving.

Wednesday, December 5, 2012

Apple Pie Rolls

Have an apple pie craving? I have just the thing…

First, you take some apples and some cinnamon and some sugar and some lemon juice and mix it all up. Then you take your trusty egg roll wrapper and brush egg wash around all four sides.

Baked Apple Pie Egg Rolls
Then you give it a little tuck here and a fold there, like so.
Baked Apple Pie Egg Rolls
Then you roll the pretty little thing up all nice and neat.
Baked Apple Pie Egg Rolls
Repeat.
Baked Apple Pie Egg Rolls
Bake until they’re all golden and oozy (and just before they’re done, brush them with some melted butter and sprinkle with cinnamon sugar). Because that’s just how we roll.
Baked Apple Pie Egg Rolls
You can do that, can’t you? I knew you could. Because you’re awesome. Then you will have golden, crispy egg rolls filled with perfectly cooked, steamy fresh apple pie filling. Good grief, Charlie Brown!
Baked Apple Pie Egg Rolls
Can’t you just smell it? It’s divine. Make some. The whole family will love it.
Baked Apple Pie Egg Rolls
Yield: 10-12 egg rolls
Baked Apple Pie Egg Rolls
Adapted from Chef-in-Training, originally from Spoon Fork Bacon
Ingredients
  • 2 apples, peeled and diced (I used Granny Smith)
  • 1 lemon, juiced
  • 1/3c sugar
  • 4T flour
  • 2t cinnamon
  • 1/4t allspice
  • 1/8t salt
  • 10-12 egg roll wrappers
  • 1 egg, beaten
  • 1T butter, melted
  • cinnamon sugar

Instructions
  1. Preheat oven to 375. Line a large baking sheet with parchment paper and lightly spray the parchment with non-stick spray.
  2. In a bowl, stir together the apples, lemon, and sugar. Add the flour, spices, and salt.
  3. Beginning with one egg roll wrapper, lay it out on a work surface (I used a cutting board) and brush egg wash around each edge. Scoop about 2 tablespoons of apple filling onto one edge. Fold in the sides and roll up the egg roll tightly. Place on the parchment-lined baking sheet. Repeat until all the filling has been used.
  4. Bake for 20 minutes. Remove from oven and brush each egg roll with melted butter, then sprinkle each with cinnamon sugar. Return to the oven for 5 more minutes.
  5. Serve hot with vanilla ice cream or sweetened freshly whipped cream.
Notes
Egg roll wrappers are crispy when baked and the interior layer is chewy. If you prefer your egg rolls fried, these would also be delicious deep fried, then dusted with cinnamon sugar after frying.

Cran-Pistachio Cookies

These are easy enough that you could easily whip up a 7-8 dozen for a cookie exchange. Somehow I managed to complicate an easy recipe like this.

Cran-Pistachio Cookies
 
Source: Betty Crocker
Ingredients:
1 (1 lb 1.5 ounce) pouch Betty Crocker Sugar Cookie Mix
1 box (4 serving size) pistachio instant pudding and pie filling mix
1/4 cup flour
1/2 cup butter, melted
2 eggs
1 cup dry roasted salted pistachio nuts, chopped
1/2 cup dried cranberries, chopped
optional – green food coloring (I didn’t add any but if you wanted them extra green you could)
Instructions:
Preheat oven to 350 degrees.
In a large bowl stir cookie mix, pudding, and flour. Add melted butter and eggs and stir until incorporated.
Add pistachios and cranberries and mix well.
Drop by rounded spoonfuls onto a parchment lined cookie sheet.
Bake for 8-10 minutes. The only way you can ruin these cookies is to overbake them! If you bake them too long you will lose the soft texture and they won’t be as green. They will not look done but take them out and let them sit on the pan for about 2 minutes. Trust me.
Cool on a wire rack. Store in an airtight container. Makes about 2 dozen cookies.

Tuesday, December 4, 2012

Red Velvet White Chocolate Chip Cookies

Red Velvet White Chocolate Chip Cookies
Yields about 3 dozen

Ingredients:
2 1/4 cups all-purpose flour

2 1/2 Tbsp cocoa powder*
1 1/2 tsp cornstarch
3/4 tsp baking soda
1/2 tsp salt
7 Tbsp butter, at room temperature
6 Tbsp all vegetable shortening, at room temperature
1 1/2 cups granulated sugar
1 large egg
1 large egg yolk
1 1/2 tsp white vinegar
1 1/2 tsp vanilla extract
1 Tbsp red food coloring
1 1/3 cups white chocolate chips, divided

Directions:
Preheat oven to 375 degrees. In a mixing bowl, whisk together flour, cocoa powder, cornstarch, baking soda and salt, set aside. Add butter, shortening and sugar to the bowl of an electric stand mixer and mix on medium speed until very pale and fluffy about 4 minutes. Add egg and egg yolk and mix until combine. Add vinegar, vanilla and food coloring and mix until well blended. Slowly add in dry ingredients and mix just until combine. Mix in 1/2 cup white chocolate chips. Scoop dough out by the heaping tablespoonfuls (about 1 1/2 Tbsp) and roll into balls and place on buttered or Silpat lined cookie sheets. Gently press about 6 white chocolate chips into the top of each cookie, being careful not to flatten the cookies (if you do flatten them a bit just reshape them to the height they had before adding the chips) and bake in preheated oven 8 - 9 minutes. Allow to cool several minutes on baking sheet before transferring to a wire rack to cool. Store cookies in an airtight container.

*If you want a more chocolaty cookie you could replace 1 - 2 Tbsp flour with an additional 1 -2 Tbsp cocoa, the red just won't be quite as vibrant. Or, you could replace the white chocolate chips with chocolate chips.

Crunchy Peanut Butter Cups


Crunchy Peanut Butter CupsMakes 8
Print Recipe
1/4 cup butter
3/4 cup peanut butter
3/4 cup graham cracker crumbs
1/4 cup sugar
1 cup semisweet or milk chocolate chips
1/4 cup milk
Sea salt
Line a  muffin tin with papers (you could also use a mini muffin tin if you prefer).
In a microwave safe bowl, melt the butter & peanut butter together for 45 seconds.  Stir until smooth.  Add graham cracker crumbs and sugar and mix to combine.  Distribute mixture evenly between the prepared muffin cups.  Refrigerate for 15 minutes to set peanut butter layer.
After the peanut butter has chilled, combine chocolate and milk in a microwave safe bowl and heat in 25 second intervals until chocolate is just melted.  Stir until smooth.  Distribute chocolate evenly over the top of the peanut butter layer.  Sprinkle with sea salt and chill until firm, at least 30 minutes.  Store covered in the fridge.

Monday, November 19, 2012

Homemade Twinkies

Since we no longer can buy these anymore, let's make some that are homemade.  :0 )
 
Time: 1 hour 40 minutes
 
FOR THE CAKES:
Nonstick cooking spray or vegetable oil
60 grams ( 1/2 cup) cake flour
30 grams ( 1/4 cup) all-purpose flour
1 teaspoon baking powder
1/4 teaspoon salt
2 tablespoons milk
4 tablespoons unsalted butter
1/2 teaspoon vanilla extract
5 large eggs at room temperature, separated
12 tablespoons sugar
1/4 teaspoon cream of tartar
 
FOR THE FILLING:
6 tablespoons unsalted butter, at room temperature
165 grams (1 1/2 cups) confectioners’ sugar
3/4 cup Marshmallow Fluff
2 tablespoons heavy cream.
 
1. For the cakes: Heat the oven to 350 degrees and adjust the oven rack to the lower-middle position.
2. To make single-use Twinkie molds, cut 12 pieces of aluminum foil 12 inches wide by 14 inches long. Fold each piece of foil in half lengthwise, then fold it in half again to create a rectangle that’s about 6 inches long and 7 inches wide. Repeat to make a dozen rectangles.
3. Place one sheet of folded foil on a work surface with a standard-size spice jar on its side in the center of the foil. Bring the long sides of the foil up around the jar, folding the sides and ends as necessary to make a tight trough-shape from which the jar can be removed. Repeat to make 12 foil molds. Spray generously with nonstick spray or coat with vegetable oil. Place the molds on a baking sheet.
4. In a mixing bowl, whisk together the cake flour, all-purpose flour, baking powder and salt. In a small saucepan over low heat, heat the milk and butter until the butter melts. Remove from the heat and add the vanilla. Cover to keep warm.
5. Using a standing mixer, beat the egg whites on high speed until foamy. Gradually add 6 tablespoons of the sugar and the cream of tartar and continue to beat until the whites reach soft peaks.
6. Transfer the beaten egg whites to a large bowl and add the egg yolks to the standing mixer bowl (there’s no need to clean the bowl). Beat the egg yolks with the remaining 6 tablespoons sugar on medium-high speed until the mixture is very thick and a pale lemon color, about 5 minutes. Add the beaten egg whites to the yolks, but do not mix.
7. Sprinkle the flour mixture over the egg whites and then mix everything on low speed for just 10 seconds. Remove the bowl from the mixer, make a well in one side of the batter, and pour the melted butter mixture into the bowl. Fold gently with a large rubber spatula until the batter shows no trace of flour and the whites and yolks are evenly mixed, about 8 strokes.
8. Immediately scrape the batter into the prepared molds, filling each with about
3/4 inch of batter. Bake until the cake tops are light brown and feel firm and spring back when touched, 13 to 15 minutes. Transfer the pan containing the molds to a wire rack and allow the cakes to cool in the molds.
9. For the filling: Using a mixer, beat together the butter, confectioners’ sugar and Marshmallow Fluff. Add the cream and beat just until smooth.
10. Just before filling the cakes, remove them from the foil. Using the end of a chopstick, poke three holes in the bottom of each cake. Wiggle the tip of the chopstick to make room for the filling. Transfer the frosting to a pastry bag fitted with a 1/4-inch round tip. Pipe frosting into the holes in each cake, taking care not to overfill, until it gently expands. Unlike real Twinkies, these won’t last indefinitely. They’re best served still slightly warm.
 
Yield: 12 homemade Twinkies.

Thursday, October 25, 2012

Pumpkin Pie Bites

Pumpkin Pies
I’ve been in a mini-mood lately when it comes to baking and these bite-sized pies met my big craving.
They are really, really easy. Let me show ya.
Pumpkin Cutter
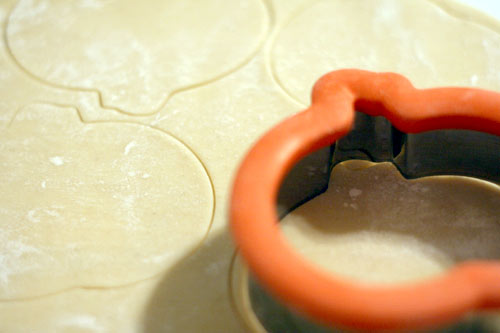
Of course, it didn’t hurt that I used ready to roll refrigerated pie crust. It comes two to a box and if you roll each round pie crust a little bit thinner with a rolling pin, you can get 24 mini pumpkin-shaped pie crusts out of them. Make sure you use all the dough scraps and re-roll to maximize quantities.
Dough
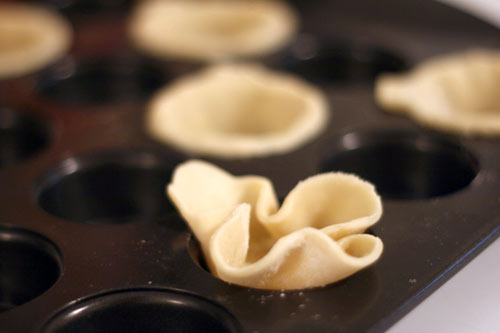
Then, stuff each one in a mini muffin baking pan. This one holds 24.
Pumpkin Shells
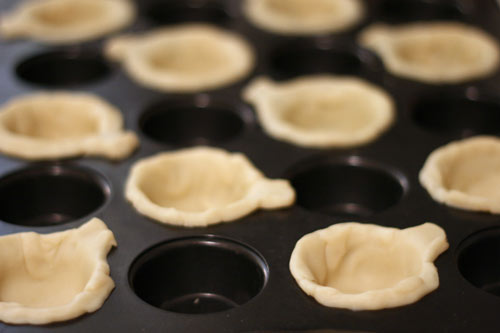
Press the dough down, in and around the edge of each muffin cup. Make sure the stem for the pumpkin stays sticking out. You’ll notice I alternated cups above. I did this mainly to make sure the pie crusts didn’t touch each other. So I ended up baking these in two batches.
Pre-baked
Fill each pie crust with pumpkin filling all the way to the top.
Puffed Pumpkin Pies
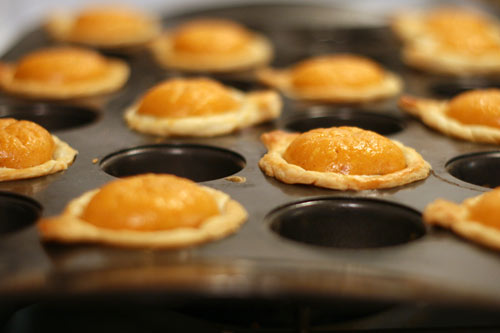
When they come out of the oven, they’ll be puffed up like this. Too bad they didn’t stay that way. That would be pretty darn cute.
Pumpkin Pies
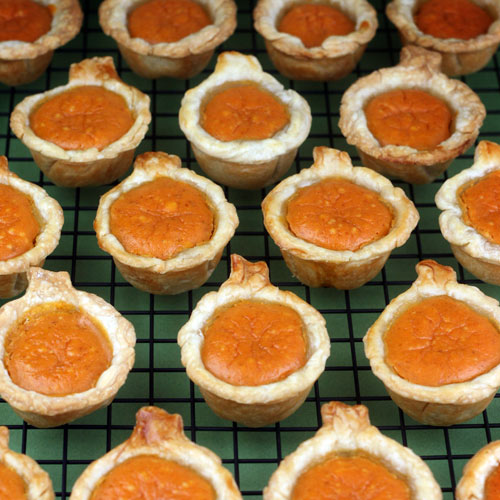
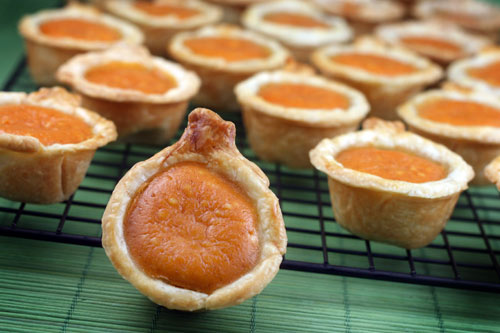
But no, after they cool for a few, they’ll fall and be flush with the pie crust.
See… easy mini pumpkin pie bites. These would be really cute at Thanksgiving.
Drizzled Pumpkin Pies
You can even drizzle them with melted chocolate to jazz them up a bit. Just melt some chocolate in a heat-proof bowl in the microwave on medium. Heat in 30 second intervals, stirring in between. You can also add a little bit of vegetable oil to make the chocolate more fluid. Then, transfer the chocolate to a re-sealable plastic bag and cut the corner off and drizzle away.
But wait… you say you don’t want to wait until Thanksgiving.
I don’t blame you.
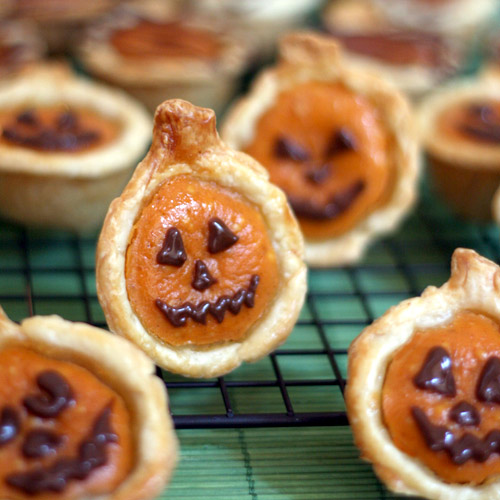
So… pipe some chocolate faces on and make them in October.
Mini Pumpkin Pies
Cute!
And I’ll say it again… easy!
Pumpkin Pie Bites
2 refrigerated ready-to roll pie crusts
8 oz. cream cheese, room temperature
1/2 cup sugar
1 cup canned pumpkin
3 eggs
1 teaspoon vanilla
1 teaspoon pumpkin pie spice
Pumpkin-shaped cookie cutter
Optional
1/2 cup chocolate morsels
vegetable oil
re-sealable plastic bags
Preheat oven to 350 degrees.
Use cookie cutter to cut 12 pumpkin shapes from each pie crust. You will need to roll the dough thinner than it comes out of the box.
Press dough shapes into a 24 cup mini muffin tray. (Make 12 at a time, alternating cups to make sure pie crusts don’t overlap each other.)
Apply egg whites from one egg to the top edges of each pie.
Mix cream cheese, sugar, canned pumpkin, remaining 2 eggs, vanilla and pumpkin pie spice together until thoroughly combined.
Spoon mixture into each pumpkin-shaped pie crust.
Bake for 12-15 minutes.
Remove pies to cool and repeat with second pie crust. Place the muffin tray in the freezer to cool it quickly for re-use.
Makes 24 pies. Keep refrigerated.
To decorate, melt chocolate in a heat-proof bowl in the microwave on medium. Heat in 30 second intervals, stirring in between until melted. Add a little vegetable oil to make the chocolate more fluid. Transfer to a re-sealable plastic bag and cut the corner off. Drizzle or draw faces on pies.
Note: The cutter I used was 3 3/4 inches wide, but if you don’t have one, don’t worry. Just use a round cutter around that size or slightly smaller to cut circle shapes out of the dough. Then make stems with the scraps. Press each stem over the edge and down the side of the dough before filling.
Pumpkin pie spice is a mixture of cinnamon, ginger, nutmeg and allspice.
Enjoy!
Pumpkin Pies

Monday, June 25, 2012

Mini Pies

My daughter's birthday party was this weekend, and I wanted to do some fun and yummy party favors for the adults that were coming to the party. 

We ended up making some pies with homemade strawberry jam.  I'll be posting the homemade strawberry jam recipe soon.

Ingredients
Frozen rolled up pie crust or make your own dough. 
Any filling you wish, we used homemade strawberry/berry jam, chocolate chips & bananas. 

Directions

Cut your pie dough to your desired shapes with cookie cutters.  We did castles & crowns. 


Place the dough on a sheet of parchment paper on top of a cookie sheet. Fill with your desired filling. Be sure to not put too much, otherwise - the filling will overflow.

Here's a pic of our desired strawberry jam.


Pinch the edges to seal the edges.  You can use a fork or take lollipop sticks and pinch the edges. Brush egg white wash on top of the pies to give it a nice toasty color when they're placed in the oven.


Bake at 375 degrees for 12 minutes, and place on a cooling rack to cool.  Your pies should have a nice toasty color.


Let cool and wrap in small treat bags & decorate accordingly.


Tuesday, June 19, 2012

American Buttercream Frosting

We LOVE this frosting recipe from Glorious Treats
 
Often the most beloved element of a cupcake is the frosting.  A good frosting can elevate a simple cupcake to a delicious, rich dessert.  Classic American buttercream is surprisingly easy to make, and can be adjusted to your personal preferences using added flavorings, and adjusting the ratio of the ingredients.  American buttercream is simply a combination of butter, powdered sugar, vanilla (or other flavoring), and usually a bit of milk or cream- that’s pretty much it!   The frosting I love to use the most often is my Cream Cheese Frosting, which is simply a variation on American Buttercream, with some cream cheese added.  Free free to play with this recipe and adjust it to your palate.  This is a very sweet, classic frosting that pairs well with most any flavor of cupcake.
 
American Buttercream Frosting
1 cup (2 sticks) butter (salted, or unsalted)
1/4 teaspoon salt (if using unsalted butter)
4 cups powdered sugar
1 teaspoon vanilla extract (best quality available)
2-3 tablespoons heavy cream, half and half or milk.
*Optional- As mentioned above, I like a cream cheese version of this frosting best.  The cream cheese adds to the creamy texture, and cuts down on the sweetness just a bit.  If desired, for a very light cream cheese flavor add 1/2 block (4 oz). cream cheese, leaving the other ingredients (as listed above) the same.  For a more traditional cream cheese flavor, reduce the butter to 1/2 cup, and add 1 block (8 oz.) of cream cheese.  If using a full block of cream cheese, you can reduce the cream or milk to 1 tablespoon total.
Flavoring options- An almost unlimited number of flavoring options can be added in addition to, or instead of the vanilla.  Orange and/or lemon zest, citrus extracts, mint extract, coconut extract or the seeds of a vanilla bean are all wonderful options.  In most cases I’ll still add 1/2 teaspoon of vanilla, then 1/2 teaspoon of the other flavoring.  For zest, add about 1 teaspoon fresh zest.  For chocolate buttercream, add 1/2 cup (good quality) unsweetened cocoa powder.
Directions-
* In the bowl of an electric mixer, fitted with the whisk attachment, beat butter (on medium speed) until completely smooth (30 seconds to a minute). (If you are adding cream cheese, add it now, then beat until smooth)
* Add salt (if needed).
* One cup at time, add 2 cups of powdered sugar, beating after each addition.
* Add vanilla, or other flavorings and beat to combine.
* Add about 1 tablespoon of cream, and continue beating.
* Add the remaining 2 cups powdered sugar, one at a time.
* Add an additional 1-2 tablespoons cream until desired consistency is reached.  If you want to pipe the frosting on cupcakes, the frosting should be nice and thick.  Continue to beat another minute or so.  The frosting should now be smooth and fluffy.
Troubleshooting-
* If your frosting is not smooth, it is likely because the butter was not fully smooth before adding the other ingredients.
* If your frosting will not hold up when piped on cupcakes, your frosting has too much liquid or is too warm.  Put entire bowl of frosting in the fridge for 15-20 minutes and it will stiffen up.  If it is still too thin, then add 1/4 to 1/2 cup powdered sugar, beat well.

Recipe Source-  American buttercream first appeared in cookbooks in the early 1900′s (here’s a little buttercream history)  Countless sources since then have included very similar versions, always using some combination of butter (or shortening), powdered sugar, milk and flavoring.  The recipe above is simply the proportions I like to use.

Wednesday, March 7, 2012

Chocolate Chip Cookie Dough Truffles

We’re really not sure why we’re obsess with dessert lately, but who really can say no to treats. Oh. My. God. If you could take perfection, roll it in a ball, and dip it chocolate, this would be it. I’m not joking here folks. I’d strongly advise you to put down the mouse and get your butt to the kitchen, stat. While one of these little guys won’t hurt, good luck practicing self-restraint when faced with a cookie sheet full of them. It’s not easy. What is easy is whipping them up. Which I encourage you to go do. Immediately.


The cookie dough itself is egg-free, and potentially dairy free AND vegan if you get picky about what you coat them with.

Chocolate Chip Cookie Dough Truffles

Yield: 3-4 dozen
Prep Time: 1 hour
Total Time: 2 1/2 hours

Ingredients:

2 1/2 cups all purpose flour
1 teaspoon salt
1/4 teaspoon baking soda
1 cup (2 sticks) butter or margarine, room temperature
3/4 cup granulated sugar
3/4 cup packed brown sugar
1 teaspoon vanilla
1/3 cup milk or soy milk
1 cup mini semi-sweet chocolate chips
14 oz dark chocolate candy coating

Directions:

Beat butter and sugars and in large bowl with electric mixer on medium speed until light and fluffy. Add soymilk and vanilla. Stir in flour, baking soda and salt and mix on low speed (or by hand) until incorporated. Stir in chocolate chips.
Cover and chill dough for 1 hour.
When dough is firm enough to handle (it may help to lightly flour your hands), form dough into 1″ balls and arrange on a baking sheet lined with waxed paper. Place sheets in freezer and let chill for 30 minutes.
Melt chocolate candy coating in a double boiler or in microwave according to package directions. Using forks or a dipping tool, dip cookie balls into candy coating to cover. Tap fork on side of pan to remove any excess coating, and return to waxed paper-lined baking sheets. Chill until set. Store, chilled, in an airtight container for up to 1 week (though good luck making them last that long).